Monday, May 10, 2010

Framed Magnetic Boards

I'm BAAAACK! did you miss me?
We had a family vacation the past 5 days and I had such a great time with my 3 guys. Relaxed family time is always great to have, sadly I don't think we get enough of it..wait, but who does, right?
There was ONE thing missing for me on vacation...my sewing machine. oh how I missed it! Sadly, I didn't make my deadline I gave myself before vacation. I really wanted to make a beach quilt, but didn't finish it in time. Hopefully we'll head out there over the summer again and maybe then I can make my 2nd deadline :)
all in all my 2 weeks before vacation were absolutely insane, so i must have been just as crazy to think I would get something so time consuming done! ha! The tuesday before leaving town, I did host a craft night though! We had fun and it was a super easy craft! My few friends that came were so quick and loved their creations. Now i have to think up the next project for craft night.

Framed Magnetic Boards:

I took pictures of the finished product, but nothing during for a tutorial. However here is a list of items we used:
10" X 13" frames from Hobby Lobby ($15.99 @ 50% off)
Scrapbook paper (2-3 sheets each)
rick rack or ribbon
upholstery nails
wooden letter or cross accent
tin sheet (if you don't have any or can't find something similar- you could get some chip board and paint it with the magnetic paint)
hot glue gun and sticks

Steps:
1. Take out the glass & sheet from the frame (won't need them)
2. Use the backing of the frame and decoupage or even paint it- you can do a solid color or print.
3. Decoupage the tin sheeting. *I found these tin sheets about 5 years ago at JoAnn's on clearance and never used them...FINALLY getting a use for them!
4. Glue the tin sheet onto the backing
5. Glue the rick rack or ribbon on top of both pieces and secure in back with hot glue
6. Paint accent piece, once dry glue on.
7. Get upholstery nails and cut off the nails and glue down the tops into each corner
8. Make some cute magnets out of jewels

So maybe this wasn't what my directions say to do in my picture, but it's close enough and super easy!


Thursday, April 29, 2010

Inspiration

I know in the next year sometime my youngest will be moving into a big boy bed. I will be happy if he stays in his crib until 3, that would be great! Realistically, probably not going to happen. When my oldest went into a big boy bed I made him his bed quilt (which was my 1st!) I never had an interest until I came across this blog one day. SUCH inspiration. I never quilted in my life and could barely sew at that point, but I wanted to after seeing what she can do!
And here I am yet again, easily found some inspiration for little M's quilt for his big boy bed. I'll use the same fabrics as I used in his brother's. Which will be the easy part, no fabric shopping! well okay, that's my favorite part, I can just get myself into trouble.
Anyway, I love love love this quilt design! I will definitely be making this one for my sweet baby :)
Animal Sherbet Squares Quilt from Film in the Fridge


but with the prints from Mason's quilt:
upclose:
backside:
front side:


Tuesday, April 27, 2010

Babies babies everywhere!


not only is it wedding season (my regular job industry) it's also baby season so any freetime I have i've been busy making baby gifts! I can showcase 1 of them after this weekend. YAY! i love it, one of my favorites so far!
I made a little thank you gift for a sweet friend of mine who spoiled me and took me away for an entire day of shopping earlier this month. She is such a foodie & amazing culinary cook. I finally got around to delivering the gift to her house yesterday ! Wish I had taken a picture of it all put together, it was cute! I put together a little Starbucks gift card, a cute zebra print to go coffee mug & a cute tea towel i made. I love the pleats! It just reminded me of my sweet friend! ...Wishing i had ironed it now! ha!


Monday, April 12, 2010

Curtains!

I have 3 lovely windows across one wall of my craft room that looks out into the backyard. It lets in some really nice light, but nothing direct. I decided I needed something funky and kind of girly for window treatments. But..... since I'll forever be outnumbered by boys, I'd do boyish colors in my craft room, but make it girly too. They're more decorative than functional and I've been keeping them open instead of close, but just so you can get the whole effect.....


ahh ! I love them! i have 2 more panels to finish up tomorrow, but I'm very happy with them :)

Saturday, April 10, 2010

Another project adding to the list....

I LOVE reading craft blogs. I just like to see what people are doing out there. I came across this tutorial on at Second Street.

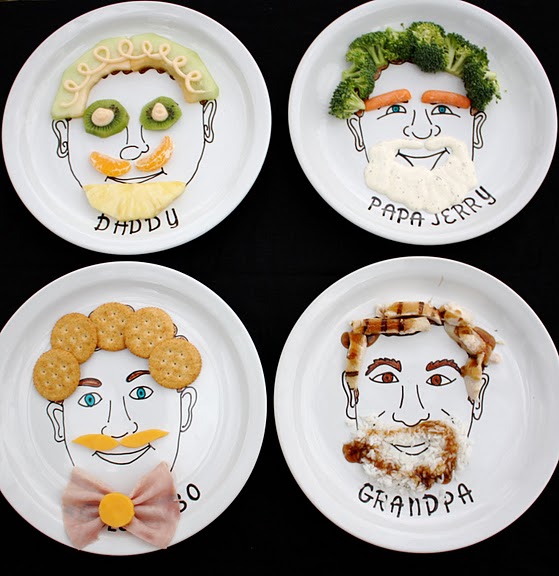
Food Face How to

How CUTE are these plates??? I think it would add a whole new fun way of eating for Mason at dinner time.

I will definitely be making some........soon...
so cute and creative!

Wednesday, April 7, 2010

1st Official Ladies Night IN

this last weekend I went to Canton that is the most wonderful gloriousness if you have some $ to spend. I went & had a girls day with 3 great friends from my bible study. Boy did we have a blast! So many things to see....and buy.
Some cute ideas are almost always better when you do them yourself. For instance our chalkboards we made. They were selling for $75 with a few little iron adornments. SO we bought the cabinet doors for $2-5/piece and just a few dollars for each iron piece and had a craft night of it!

Ms Marsha with her beautiful piece. Marsha is a scrapbooker. I think I might be breaking her into being a 'crafter'. She had a blast & I'm so glad she did :)


Ms Kim and her beautiful chalkboard. Instead of just painting hers, she also decoupaged paper onto hers. It'll look so cute in her kitchen! Good Job Kim :)


And of course my camera battery died right before taking my picture. Oh well, here's mine this morning. I love the bottom iron piece with the hook & bird. It looks great in my craft room!

Thursday, April 1, 2010

Quilt progress!

Finally got a chance to sit down tonight and finish up the quilt top I've been working on! This has really turned into a crazy looking picnic quilt, eh? oh well...I'm enjoying it! I'm hoping to finish it soon in the next week or 2 so I can start on ANOTHER quilt.. But we're talking BASIC for the next one. We're planning a trip out to CA sometime next month and I'd love to have a large quilt to keep at my Dad's place to have when we're down on the sand. yes, I know. I do this to myself don't I? I just create more projects for myself. oh well, it's how it goes I guess.

I was planning on just having the large 10" X 10" blocks in the middle, but decided it was just too boring for me. So once i had all the blocks sewn together i cut it into 4 & off set my 4 blocks and sewed them back together.

But for now, my quilt top is finished! must finish up the basic backing, baste it, quilt it & make the bias tape. I'm thinking about finishing it off with the solid aqua green, but I was planning on making the solid the backing too. or should i do something crazy with the polka dots or the pink striping or damask print?