Thursday, March 18, 2010

Colors selected

Fabric shopping is so much fun!
I MAY or MAY not be guilty of stopping at Joann's yesterday on our way to a playdate & finished my fabric shopping for this next quilt, which resulted in us being late....

either way, I got everything cut today & my layout of the center of the quilt figured out. i loooove the brown & white zebra print... my husband will hate it, but I don't care- it's not for him ;-)

Loving it so far :)

From March2010

Tuesday, March 16, 2010

getting the urge...

to quilt again! I haven't made one since around Christmas...in fact..it was these 2 T-shirt quilts I made for Meredith...

From Crafts

Don't mind my husband's lovely pajama pants. ;)

From Crafts


I really enjoy quilting...I've made 4 quilts in the past year now...maybe it's about time i make one for myself! We've been enjoying some park time lately & eating outside quite a bit, got me thinking I should make myself a 'picnic quilt', big enough for us to hang out on (laughing at myself thinking oh boy what projects i put on my self!)
i think the main part of the project i REALLY enjoy is the fabric shopping. I LOVE shopping for fabric.

Why do I add projects to my ever growing to do list? I guess i just need a challenge for the next few weeks...I have the next 2 weeks off, which means I need to do something I guess! Maybe in that time I can finish the baby gift I've been meaning to make and I do have the T shirt quilt that I need to finish for my "Project Manager"....
...here it is infact....
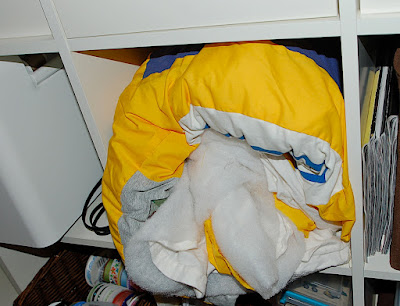
right where it's been for quite some time...
From Crafts


yup, rolled up in a cubby. a while back (when i was just starting to quilt!) i had pinned & basted the top of her t shirt quilt (which my mom made for her & never was able to finish) then started quilting it & learned somethings of what NOT to do. so it since got rolled up in a ball for another day. I know what I need to fix, i just don't want to re-pin & baste! I hate that part! so maybe next week i'll get around to it finally.

So here is my color scheme for MY new quilt...surprise surprise...it'll probably match my craft room color scheme. SPEAKING of which, maybe next week I'll get my new curtains made too for my craft room.

From Crafts


Recognize the Aqua damask? I *DO* think i might need to run to the fabric store tomorrow to find 2 additional prints, i think some more brown is needed, and one more print..we'll see how it comes together then :)

I'm also slowly making some progress on the craft room...i bought knobs today to replace the ugly ikea knobs. here they are on my billy bookcases...another thing to do next week...craftroom progress!
From Crafts

Reason why I wish i could knit!

Okay so I CAN knit, i have just never tried anything more than a scarf...
HOW CUTE ARE THESE PANTS!!!!!


click here

Wednesday, March 10, 2010

Bag Tags

Having preschoolers I feel like more and more often we've got little gifts or goodies being given to friends, neighbors, teachers...I'm always trying to find a cute way to present those goodies. Reason #12 why I love cardstock! So easy to design a little taggie, fold it over & attach onto the cellophane bag!
Here's just a few recent ones I've done for teacher goodies (with starbucks gift cards, and a coffee cup sleeve with a handle along with other goodies), Birthday goodie bags, and also christmas goodies for our neighbors and friends :)


Tuesday, March 9, 2010

Light Switch plate cover revamp!

Our house was built in 1988 & a few of the rooms still have the IVORY outlet plate covers & light switch plate covers. GAG! In most of the house we've switched them out. I just had to do something cutesy for my craft room. Also did one for the boys' room too.
From Crafts

Curious, does anyone still use the intercom systems? We have one in our house & have never touched it in the 3 1/2 years we've lived here. what an eye sore too!


So here's an easy to do revamp. Oh how I love reusing & recycling!!

What you'll need:
Modge Podge
Razor Blade
Scissors
fabric (cotton), scrapbook paper, or tissue paper
sponge brush
sand paper
your old light plate covers
clothes pins or heavy duty paper clips
if you are using heavier fabric or scrapbook paper then some rubber cement would be good too!

From Crafts


Step 1: Sand down the switch plate covers to rough up that nasty ivory so it'll hold onto the glue better.

Step 2: cut out fabric just slightly larger than the plate cover- maybe 1/2" or 1" larger on all sides.
From Crafts


Step 3:
Brush on the modge podge

From Crafts


Step 4:
Place the fabric face down & put the plate cover right side down onto the back of the fabric in the middle. Apply some pressure.
From Crafts


Step 5:
Start folding over the fabric & put some of the glue on the backside too. This is why i love clothespins. They're good for everything! clip them on so they'll hold down the fabric. you can clip the corners like so. Believe me this does NOT need to be perfect, we'll smoother over those corners later.
From Crafts


Step 6:
Let dry & go eat some lunch. or nap. either way it doesnt take long for it to dry.
From Crafts


Step 7:
i loooooove this fabric. i picked it up at Joann's last week. Didn't know what I would use it for, but I sure do love it! I think I need a skirt out of it too.
Anyway, smear on some more Modge Podge on top of the fabric or paper, including those corners & stick the clothes pins on the corners to help those puppies lay down. Let it dry. doesn't take long, maybe 20 minutes tops.
From Crafts


Step 8:
So now you've got this nice clean covered plate cover. Get your razor blade or exacto knife & make an X where the switches go & fold them in.
From Crafts


GACK! I already forgot how ugly that Ivory is! (is that even "ivory" !?!?)
From Crafts


Step 9:
Either Modge Podge or glue down those corners on the inside & let it dry. Well i didn't. I smoothed out the inside of the switch spots & made a tiny slit where the screws go & hung them right up!
From Crafts


Step 10: Hang them up! But don't lose a screw like I did. Oops.
From Crafts


I also hung a canvas OVER the intercom system speaker.....hmmmm now I need some inspiration of what to paint on this canvas. For right now the plain white canvas looks 100% better than the speaker! HA! maybe I should hang it a bit more straight though.
From Crafts


Here's the 2 that I made for my Boys' room last year, it's a vintage liscence plate/route 66 theme:
From Crafts


From Crafts


Enjoy!

Sunday, March 7, 2010

Dresser Makeover!

So originally I bought this basic 4 drawer dresser when I was pregnant with my oldest. Couldn't find a dresser I liked anywhere & didn't want to buy the $500 changing table dresser. I wanted something that would last thru his teen years that didn't look like the 2 level changing table dresser. BEFORE i thought about IKEA, I bought a nude wood 4 drawer dresser & my husband stained it a dark brown for me. Then after M was born we were at Ikea and *THE DRESSER* was there. so then we had 2 (dressers that is, well we do have 2 kiddos now). I could have sold the 1st one on craigslist...actually I think i tried. Good thing it didn't sell. I ended up sticking it in the dining room corner. Sounds wierd, but it stored all my craft stuff in the dresser. it worked. for a while.
NOW, that I have a craft room & I live with 3 boys- this room is getting a complete girlified makeover. Funny thing is, my color scheme is blues, browns and whites. BUT allll girlie stuff that my husband would hate. think brown zebra print, ruffles, textures and all things girlie.

So then the dresser comes into play. The dark brown was just depressing in here, all the furniture is white, soooo......I had some fun on Friday! I was off work early, so I came home, opened the windows, turned on some music & had fun. My husband saw that crazy look in my eye so he stayed away.
I pulled out the drawers & sanded them down & the dresser too. Threw on a coat of white paint. Okay, so I got lazy & didn't do the whole thing with a coat of white, I did it on the dresser at least, but not the drawers. PERFECTION IS NOT KEY HERE!
Since I used my white acrylic paint (funny, right!) it dried very quickly. Then I used my Olympic "Sea Sprite" eggshell wall paint & went to town.
After picking up the boys from school, little M went down for a nap & I just lightly sanded down a few spots to rough it up & distressed it some.
LOVE HOW IT CAME OUT!

couldn't find a before shot. bad me. Buuuut I do have it as a background in this first pic...just so you get an idea.


finished project!! Don't you LOOOVE?


upclose distressed.


doesn't it look like it's been around for years? like it's been stuck in my grandmothers barn? if she had one? The best thing about it, if it gets scratched or scuffed, it's okay. It'll just add to it!
I LOVE recycling old furniture pieces!!!!


oh and if you're curious which dresser is now in my Boys' room, it's this one from ikea. Hands down makes the best changing table. It's the Hemnes 8 drawer dresser.

Yes I know, there's one white shelf & 1 black on the wall. Can you believe that was the ONE thing that would have completed the nursery (for both boys) and my husband 'never' got around to painting it black? God bless him. That's all I gots to say.

Burp Cloth tutorial

I love making these for baby gifts! Apparently, I love doing them so much that I'm making 2 sets of 3 FOR my sister who is giving them as gifts. HOW did that happen? There better be some good thank you out of this! ;) Bitterness aside, *I* love making these as gifts when I get to be the one giving them away! HA! They are super easy and who doesnt love cutesy fabric adorned burp cloths? (Thinking I might have to give my sweet sister a name/alias on this blog...perhaps "Project Manager" suits her juuuust fine. it still keeps her anonymous, right?) Love you sis! :)
Let me show you how easy it is!

I know some people say to prewash everything, but I don't. is that bad? I barely get my own laundry done, so this sure wouldn't get done if that was the case.

First you need:
Burp cloth
Fabric
Coordinating ribbon
white thread
sewing maching

1. Measure & cut fabric- I generally cut the fabric length about 21" long by about 4" wide. burp cloths are less than 21" long, but i tuck the ends of the fabric length in, pin & stitch for extra secureness. is that a word?
From Crafts


2. as i just said, tuck & pin the ends. sides don't need it because they will be covered up with the cute ribbon. I sew a lot of things and I don't pin much...shhh. i know. maybe I should pin things more. anyway, these I DO pin when working on them.
From Crafts

3. Stitch the ends and down the length of each side in the middle of the burp cloth.
From Crafts

4. These wonderful lines will help you stay lined up! Use them.
From Crafts


From Crafts

5. Once you've gotten it all stitched down, measure 2 lengths of ribbon. ~20-21" is good. Remember you need 2. WOW i did not stitch very straight on the right side. good thing is doesn't matter!
From Crafts

6. start at one end with the ribbon lining up right on top of the fabric. I have the end of the fabric meet the middle of the ribbon width. does that make sense? I again, tuck the end of the ribbon under itself & pin then work my way down one side & then the other.
From Crafts

7. Stitch down each side of each ribbon. I use the pressure foot as my guide to make sure I'm sewing straight lines. you do actually want these lines to look straight.
From Crafts

8. Don't snip the tails yet. I keep them long & when I'm done I double knot them tightly & then trim the threads.
From Crafts

9. TADA. all done. easy, right?
From Crafts

Here's the first set for my sister's friend who is having a girl. I hope she tells L that I made them & not her! I think the middle pink damask & green ribbon is my favorite!
From Crafts

Here's the set for her other friend who is having a boy. My sister plans on embroidering their initials on top of the fabric for some extra cutsiness!
From Crafts