Sunday, May 30, 2010

Tea Towel Apron


Today is my friend Nicole's Birthday & we got together last night for a night out with our husbands another couple friend. I saw this idea at a cute boutique a while back and choked on my spit when I saw the price tag. Knowing me~ (big surprise) "I could SEW make that." so I ran out to target, picked up a black hand towel, headed to the fabric store & picked up some UT print & orange fabric. (her and her husband bleed orange.) and surprisingly enough, I don't have EITHER in my stash. I think it came out cute! I was worried it would come out too halloween-y with so much black, but I think the Zebra added some fabulousness & broke up the orange and black enough.
This apron was fairly easy to make- I didn't make too many mistakes! just lining up the ruffles to fit the towel length was the time consuming part besides actually putting it together!
I think i might have to make myself one- perhaps non college related though. I see some bring summer colors & polka dots in my future :)

Baby Blocks

I did an order a while back for another set of blocks-
baby Luke's room is a modern cowboy theme with a bit of vintage- which is perfect. kind of like me. Confusing combo.


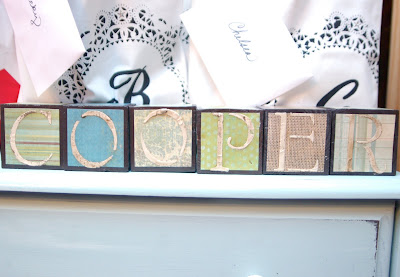
My friend Melissa's nursery is a jungle theme for baby Cooper. I had to do a bit of facebook stalking, but thank goodness she posts pictures :) Who hasn't facebook stalked before? oh...you haven't??

Anyway, here's her cute blocks for baby Cooper's room!


Teacher Gifts

last week my boys had their last day of preschool for the spring semester. Thank the lord their summer session starts Tuesday!
Anyway, I did what I thought was some pretty cute teacher gifts!

I made these cute tote bags that I came across a while back-
Doily Canvas Bag Tutorial

SUPER duper easy. requires a doily, acrylic paint, brush, bag, and painters tape.
For the letter, I printed off the letter, cut it out, traced it onto the bag, lined the letter with permanent marker, then filled in with the paint & heat set it. (iron it.) then I pulled out my bedazzler and played around :-D

In their bags I had these items:
a gift card
a bundtlette from Nothing Bundt Cakes (Thanks dear sister for the idea!) wrapped it in cellophane & printed off a tag that says "Thanks a Bundt!"
good thing these little cakes were sealed! they smelled delicious!


a jar of citrus hand scrub- here's the recipe for it:


1 cup of sugar
1/2 cups of kosher salt
citrus zest- I used Grapefruit (maybe 1 Tbsp worth)
1 Tbsp of juice (you could use lemon, lime, grapefruit or whatnot)
1 cup of Olive Oil
if you don't want the lemon flavor, you could always add some type of essential oil (I think eucalyptus would be nice!) but I added a few drops of lemon extract for some extra zing! :)
Mix together and fill a jar- this combo filled 2 jars & gave me some extra to use!

Baby Play mats

I finally learned to sew last spring & boy have I come far in the past year. And I still feel very amateur, but I am proud of what I can come up with. Even if that means using my seam ripper multiple times. :-/
Since I have so many friends at the age of reproduction, I feel like I'm going to a baby shower every other month. My husband is happy when i GO to the showers, not host or help host them. :) haha! Since I've learned to sew, playmats are of the gifts I give at each baby shower (along with burp cloths, name blocks, and usually a something little else. Playmats are one of those things that you really need, and not a musical type one with huge arms and toys hanging off it. You need a simple mat that can be taken outside, to the Grandparents house and get rolled up and stuck in the diaper bag! So that's why I started making them. The great thing about it is when the babies out grow the playmats, they also make great picnic mats!
My friend Marsha is due early June with a sweet baby girl. I have to say this playmat is my favorite so far! Marsha's nursery is pink, green and black with some polka dot fabric, so I made my own spin off and found some cute fabrics that all incorporate the circles/polka dot theme in them. I also finished it off with black polka dot ruffles all the way around the playmat.


Another friend Melissa is due in July & had her baby shower last weekend. They are big University of Texas fans & I debated about doing orange.....but I just couldn't do it. Not that I'm not a Texas fan..orange just isn't my thing. Melissa has a jungle theme for baby Cooper, so I pulled in the browns, greens & blues. A little more simple for a baby boy, but I think it's just as cute!

Monday, May 10, 2010

Framed Magnetic Boards

I'm BAAAACK! did you miss me?
We had a family vacation the past 5 days and I had such a great time with my 3 guys. Relaxed family time is always great to have, sadly I don't think we get enough of it..wait, but who does, right?
There was ONE thing missing for me on vacation...my sewing machine. oh how I missed it! Sadly, I didn't make my deadline I gave myself before vacation. I really wanted to make a beach quilt, but didn't finish it in time. Hopefully we'll head out there over the summer again and maybe then I can make my 2nd deadline :)
all in all my 2 weeks before vacation were absolutely insane, so i must have been just as crazy to think I would get something so time consuming done! ha! The tuesday before leaving town, I did host a craft night though! We had fun and it was a super easy craft! My few friends that came were so quick and loved their creations. Now i have to think up the next project for craft night.

Framed Magnetic Boards:

I took pictures of the finished product, but nothing during for a tutorial. However here is a list of items we used:
10" X 13" frames from Hobby Lobby ($15.99 @ 50% off)
Scrapbook paper (2-3 sheets each)
rick rack or ribbon
upholstery nails
wooden letter or cross accent
tin sheet (if you don't have any or can't find something similar- you could get some chip board and paint it with the magnetic paint)
hot glue gun and sticks

Steps:
1. Take out the glass & sheet from the frame (won't need them)
2. Use the backing of the frame and decoupage or even paint it- you can do a solid color or print.
3. Decoupage the tin sheeting. *I found these tin sheets about 5 years ago at JoAnn's on clearance and never used them...FINALLY getting a use for them!
4. Glue the tin sheet onto the backing
5. Glue the rick rack or ribbon on top of both pieces and secure in back with hot glue
6. Paint accent piece, once dry glue on.
7. Get upholstery nails and cut off the nails and glue down the tops into each corner
8. Make some cute magnets out of jewels

So maybe this wasn't what my directions say to do in my picture, but it's close enough and super easy!